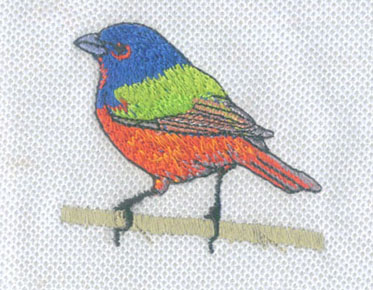
Creating Realistic Texture in Embroidery: Advanced Digitizing Tricks
Embroidery, with its rich tapestry of stitches, has the power to transcend the visual realm and evoke tactile sensations. Achieving realistic texture in embroidery digitizing requires a nuanced understanding of design principles, stitch techniques, and a keen eye for detail. In this guide, we'll explore advanced digitizing tricks that elevate embroidery beyond the visual, allowing you to bring intricate textures to life with every stitch.
1. Understanding the Basics of
Texture
Texture is the visual and tactile quality of a
surface, and in embroidery digitizing, replicating this texture involves a
combination of artistry and technical skill.
Visual
Texture:
● Implied Surface Quality: Conveys the appearance of a certain texture without physical depth.
● Achieved through Stitches: Different stitch types and patterns can create the illusion of visual
texture.
Tactile
Texture:
● Physical Surface Quality: Represents the actual feel and depth of a surface.
● Dependent on Stitch Density: Varying stitch densities and lengths contribute to tactile texture.
2. Choosing the Right Stitch
Types
Selecting the appropriate stitch types is
fundamental to replicating realistic texture in embroidery digitizing. Each
stitch has its unique characteristics that contribute to the overall visual and
tactile effect.
Satin
Stitches:
● Smooth and Shiny: Ideal for surfaces with a smooth and reflective texture.
● Varied Lengths: Vary satin stitch lengths to emulate different shades and depths.
Fill
Stitches:
● Versatile Texture: Fill stitches can mimic a variety of textures, from fabric to fur.
● Directional Stitches: Adjust the angle and direction of fill stitches for nuanced textures.
Run
Stitches:
● Linear Texture: Run stitches are excellent for creating linear textures like wood
grain or fur.
● Variable Stitch Lengths: Varying stitch lengths add depth and authenticity.
Column
Stitches:
● Raised Texture: Column stitches can simulate raised textures, such as corduroy or
ribbing.
● Density Adjustment: Control stitch density to influence the height of the texture.
3. Layering for Depth and
Dimension
Layering stitches strategically is a powerful
technique for adding depth and dimension to your embroidered
textures. This involves overlaying different stitch types or adjusting
stitch directions to create intricate visual and tactile effects.
Combining
Stitch Types:
● Overlay Satin and Fill
Stitches: Combine satin stitches for smooth surfaces
with fill stitches for texture.
● Experiment with Combinations: Layering allows for experimentation with stitch combinations.
Stitch
Directional Changes:
● Diagonal vs. Horizontal
Stitches: Changing the direction of stitches alters
how light interacts with the texture.
● Shadow and Highlight Effects:
Create shadows and highlights by varying stitch
directions.
Density
Gradation:
● Gradual Stitch Density
Changes: Gradually increasing or decreasing stitch
density mimics gradual changes in texture.
● Smooth Transitions: Achieve smooth transitions between different textural elements.
4. Digitizing for Specific
Textures
Different textures require different
approaches in embroidery digitizing. Whether replicating the softness of
feathers, the roughness of bark, or the sheen of silk, tailoring your digitizing
techniques to specific textures is key.
Fabric
Textures:
● Replicating Fabric Weave: Use fill stitches to mimic the weave of fabrics like denim or linen.
● Varied Stitch Lengths: Adjust stitch lengths to emulate the irregularities of fabric
surfaces.
Fur
and Hair:
● Directional Stitches: Use long, directional stitches for fur and hair.
● Layering and Overlapping: Overlap stitches to create depth in furry textures.
Metallic
Surfaces:
● Satin Stitch Sheen: Satin stitches are excellent for replicating the sheen of metallic
surfaces.
● Gradual Shading: Gradual shading using varying stitch densities adds realism.
Wood
Grain:
● Linear Stitches: Run stitches are perfect for creating the linear patterns of wood grain.
● Directional Changes: Altering stitch directions mimics the natural variations in the wood.
5. Experimenting with Color
Blending
Color plays a significant role in conveying
texture in embroidery digitizing. Experimenting with color blending techniques
enhances the realism of textures by replicating subtle shifts in color.
Gradient
Color Blending:
● Gradual Color Changes: Use gradient color blends to mimic subtle color shifts in textures.
● Soft Transitions: Achieve soft transitions between colors for a more natural look.
Variegated
Thread Use:
● Natural Color Variation: Variegated threads add natural color variation to textured surfaces.
● Consider Texture Types: Choose variegated threads based on the specific texture you are replicating.
6. Utilizing Open and Closed
Areas
The arrangement of stitches in open and closed
areas influences how light interacts with the texture. Understanding how to use
open and closed stitches strategically contributes to the overall realism of
the design.
Open
Stitches:
● Light Penetration: Open stitches allow light to penetrate, creating a sense of
transparency or airiness.
● Ideal for Delicate Textures: Use open stitches for delicate textures like lace or mesh.
Closed
Stitches:
● Solid and Opaque: Closed stitches create solid, opaque surfaces with minimal light
penetration.
● Ideal for Denser Textures: Use closed stitches for denser textures like leather or metal.
7. Maintaining Consistency Across
Elements
Consistency is crucial when digitizing multiple elements within a design. Ensuring
that various textures within the same design maintain a cohesive appearance
contributes to the overall aesthetic quality.
Consistent
Stitch Lengths:
● Maintain Uniformity: Consistent stitch lengths across different elements create visual
harmony.
● Adjust for Realism: Vary stitch lengths within each texture while maintaining consistency
across similar elements.
Unified
Color Palette:
● Color Harmony: Use a unified color palette for all elements to maintain a cohesive
and realistic appearance.
● Subtle Color Shifts: Incorporate subtle color shifts to accommodate variations in texture.
Conclusion
Embroidery
digitizing is an art form that goes beyond creating visuals; it involves
crafting tactile experiences with each stitch. By mastering advanced techniques
such as layering, experimenting with color blending, and tailoring digitizing
methods to specific textures, you can transform your designs into intricate
textural tapestries. As you embark on the journey of digitizing realistic
textures, let your creativity soar, and may each stitch weave a story that not
only captivates the eye but also invites the viewer to touch and feel the
artistry embedded in every thread.


