What is Chenille Embroidery? A Guide to This Fuzzy Style
Chenille embroidery, with its distinctive plush texture and tactile appeal, is a captivating technique that brings a unique dimension to fabric art. Rooted in tradition and celebrated for its rich, velvety finish, chenille offers a touch of luxury and elegance to a wide range of projects. This article delves into the essence of chenille embroidery, exploring its history, techniques, and applications, and guiding you through the process of creating beautiful chenille pieces. If this post has aroused your curiosity about Embroidery Digitizing and you hope to gain more knowledge, reach out to us without hesitation.
The Basics of Chenille Embroidery
What is Chenille Embroidery?
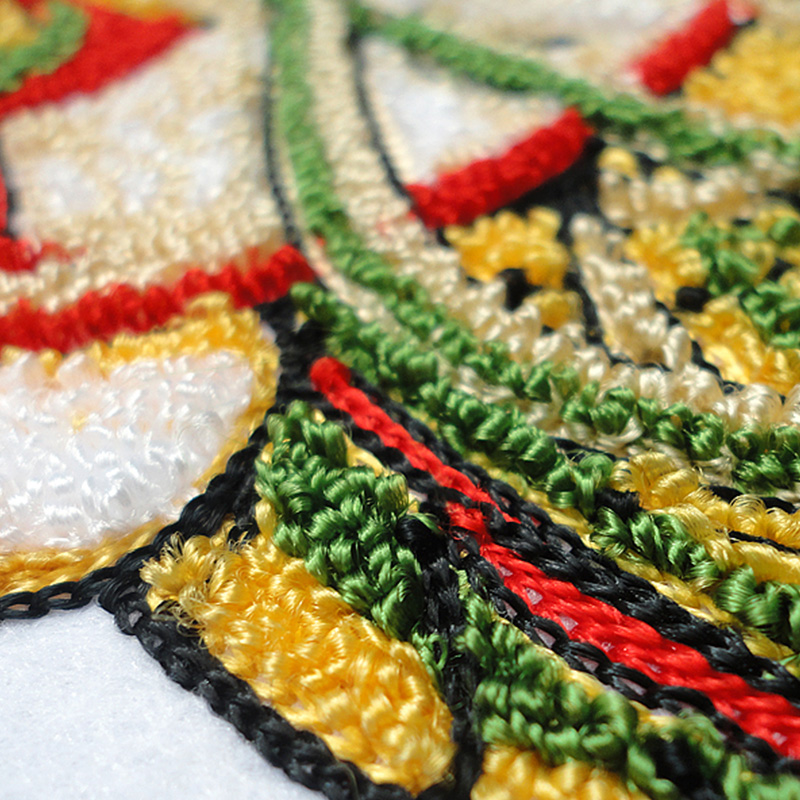
Chenille embroidery is a technique that creates a textured, fluffy surface by stitching layers of thread onto fabric. The term "chenille" derives from the French word for "caterpillar," reflecting the technique's resemblance to the soft, segmented body of the insect. This method involves forming a raised pile of threads, which results in a plush, velvety texture that can add depth and dimension to various projects.
A Brief History of Chenille Techniques
Chenille embroidery has a storied past, originating in the 18th century. Initially, it was a method used in France for creating luxurious textiles and tapestries. Over time, chenille became popular in other parts of Europe and eventually the United States. Its use expanded from decorative textiles to include apparel and home furnishings. The timeless appeal of chenille lies in its ability to create both elegance and comfort, making it a cherished technique across centuries.
How Chenille Differs from Other Embroidery Styles
What sets chenille apart from other embroidery styles is its texture. Unlike traditional flat embroidery, chenille stitches create a raised, three-dimensional effect. This texture is achieved by using specific stitching techniques and materials that give chenille its characteristic softness and depth. While other embroidery methods may focus on flat or subtle embellishments, chenille's plush quality makes it ideal for designs that benefit from a tactile and visual impact.
The Chenille Stitch Explained
Understanding the Chenille Stitch
The chenille stitch involves creating a series of overlapping stitches to build up a pile of thread. The process begins with a base stitch that is then covered with additional stitches to form the chenille effect. This layering technique ensures that the threads stand upright, creating a soft, textured surface. Chenille stitches can vary in length and density, allowing for customization based on the desired effect.
How Chenille Stitches Create Texture
Chenille stitches create texture through their unique layering process. By stitching multiple layers of thread, the chenille technique forms a soft, plush surface that feels as good as it looks. The raised texture is achieved by carefully aligning the stitches to build up the thread pile, resulting in a rich, velvety finish that stands out from other embroidery methods.
Common Uses for Chenille Stitching
Chenille stitching is widely used for creating textured elements in various projects. Common applications include decorative patches, embroidered logos, and intricate patterns on clothing and home decor items. The technique is particularly effective for adding a touch of luxury and comfort to textiles such as cushions, blankets, and apparel. Its versatility makes it suitable for both casual and sophisticated designs.
Materials and Tools for Chenille Embroidery
Essential Threads and Fabrics
To achieve the best results with chenille embroidery, selecting the right materials is crucial. Chenille thread, typically made from cotton or polyester, is ideal for creating the characteristic texture. Fabrics such as cotton, velour, and fleece are well-suited for chenille embroidery due to their ability to hold the thread's raised pile. Choosing high-quality materials ensures durability and enhances the overall appearance of your chenille designs.
Choosing the Right Needle for Chenille
Selecting the appropriate needle is essential for successful chenille embroidery. A chenille needle, characterized by its large eye and rounded point, is designed to accommodate the thicker chenille threads without damaging the fabric. This needle type helps to achieve smooth, even stitching and prevents snagging or splitting of the threads. Ensure that your needle size matches the thickness of your chenille thread for optimal results.
Recommended Tools and Equipment
In addition to threads and needles, having the right tools and equipment can make chenille embroidery easier and more enjoyable. Essential tools include embroidery hoops for stabilizing your fabric, a sharp pair of scissors for trimming threads, and a water-soluble fabric marker for transferring designs. Investing in quality tools will enhance your stitching experience and contribute to the precision of your chenille embroidery.
Getting Started with Chenille Embroidery
Preparing Your Fabric: Tips and Techniques
Proper fabric preparation is key to successful chenille embroidery. Start by pre-washing and ironing your fabric to remove any wrinkles and shrinkage. Stabilize the fabric with a backing material to prevent shifting and ensure that the chenille stitches are evenly applied. Using an embroidery hoop will help keep the fabric taut and secure, providing a stable surface for your stitching.
Basic Chenille Stitching Techniques
Begin with simple chenille stitching techniques to get familiar with the process. Start by outlining your design with a base stitch, then layer additional stitches to build up the chenille texture. Experiment with different stitch lengths and densities to achieve the desired effect. Practice on a scrap piece of fabric before working on your final project to build confidence and refine your technique.
Simple Projects for Beginners
For those new to chenille embroidery, starting with simple projects can be a great way to build skills. Consider creating decorative patches, embellished towels, or small cushion covers. These projects offer a manageable size and scope, allowing you to practice chenille techniques without being overwhelmed. As you gain experience, you can progress to more complex designs and larger projects.
Designing with Chenille Embroidery
How to Choose Designs Suitable for Chenille
When selecting designs for chenille embroidery, choose patterns that complement the texture of the chenille stitch. Designs with bold, simple shapes and large areas of color work well, as they highlight the raised texture. Avoid overly intricate designs that may be difficult to execute with chenille stitching. Opt for designs that enhance the plush quality of the chenille and fit the intended use of your project.
Incorporating Chenille into Various Patterns
Chenille embroidery can be incorporated into a variety of patterns to add texture and visual interest. Consider using chenille stitches as accents or focal points within larger designs. Combining chenille with other embroidery styles can create a dynamic and engaging look. Experiment with different placement and layering techniques to integrate chenille seamlessly into your patterns.
Combining Chenille with Other Embroidery Styles
Combining chenille with other embroidery styles can result in unique and visually appealing designs. For instance, pairing chenille with satin stitches or appliqué can create a contrast between the textured chenille and smooth, flat embroidery. This combination adds depth and complexity to your designs, allowing for creative expression and customization.
Chenille Embroidery for Different Fabrics
Best Fabrics for Chenille Embroidery
Chenille embroidery works best on fabrics that can support the raised texture of the stitches. Ideal fabrics include cotton, velour, fleece, and terry cloth, which provide a stable surface for chenille thread and enhance its plush quality. Avoid using overly stretchy or delicate fabrics that may not hold the chenille stitches properly.
Adapting Chenille Techniques for Different Textiles
Adapting chenille techniques for different textiles involves adjusting your approach based on the fabric's properties. For heavier fabrics, use a larger needle and thicker thread to ensure that the chenille stitches stand out. For lighter or more delicate fabrics, consider using a finer chenille thread and adjusting the stitch density to prevent distortion.
Tips for Working with Challenging Fabrics
When working with challenging fabrics, such as slippery or stretchy materials, use stabilizers to keep the fabric in place and prevent shifting. Choose a compatible needle and thread to match the fabric's characteristics. Practice on a sample piece before starting your final project to ensure that your chenille stitching performs well on the chosen fabric.
The Art of Chenille Texture
Creating Depth and Dimension with Chenille
The art of chenille embroidery lies in creating depth and dimension through its textured stitches. Layering chenille stitches and adjusting their placement allows for the creation of intricate, three-dimensional designs. Experiment with different stitch lengths and densities to achieve the desired level of texture and visual interest.
How to Achieve a Plush and Velvety Finish
To achieve a plush and velvety finish, ensure that your chenille stitches are evenly spaced and layered. Use high-quality chenille thread and maintain consistent tension throughout your stitching. After completing your design, gently brush the chenille surface to enhance its softness and achieve a luxurious, velvety texture.
Techniques for Enhancing Texture and Design
Enhance the texture and design of your chenille embroidery by incorporating techniques such as layering, shading, and combining different stitch types. Experiment with varying thread colors and densities to create depth and visual interest. Techniques like adding highlights and shadows can further accentuate the chenille texture and add dimension to your designs.
Advanced Chenille Techniques
Adding Details: Combining Chenille with Appliqué
Combining chenille with appliqué can add intricate details and depth to your designs. Use chenille stitches to create textured accents or focal points, while appliqué adds shape and contrast. This combination allows for creative expression and enhances the overall appearance of your embroidery projects.
Layering Chenille Stitches for Complex Designs
Layering chenille stitches is a technique used to create complex and detailed designs. By applying multiple layers of chenille thread, you can achieve a rich, textured effect that adds dimension and visual interest. Experiment with different layering techniques to create unique and sophisticated chenille designs.
Customizing Chenille for Unique Effects
Customizing chenille embroidery allows for the creation of unique effects and personalized designs. Experiment with various thread colors, stitch patterns, and densities to achieve custom textures and finishes. Use chenille techniques to reflect your style and add a distinctive touch to your embroidery projects.
Troubleshooting Common Chenille Embroidery Issues
Addressing Common Problems with Chenille Stitches
Common issues with chenille embroidery include uneven texture, thread breakage, and fabric puckering. To address these problems, ensure proper tension and stitch placement. Use high-quality thread and maintain consistent stitching techniques to prevent common issues.
Fixing Mistakes and Achieving a Perfect Finish
Fix mistakes by carefully unpicking and re-stitching problematic areas. Ensure that your chenille stitches are evenly applied and match the design’s specifications. Take the time to review and correct any errors to achieve a flawless finish in your embroidery projects.
Preventing Common Issues During Stitching
Prevent common issues during chenille stitching by using appropriate materials and tools. Stabilize your fabric, select the right needle and thread, and maintain proper tension throughout your stitching. Regularly check your work for any signs of problems and make adjustments as needed to ensure a successful outcome. If this post has aroused your curiosity about Embroidery Digitizing and you hope to gain more knowledge, reach out to us without hesitation.
Exploring chenille embroidery opens up a world of creative possibilities and design opportunities. Its rich, velvety texture and versatile applications make it a valuable technique for both novice and experienced embroiderers. By delving into the world of chenille, you can elevate your projects with a distinctive touch that combines artistry and craftsmanship.


