Stitch Length: Everything You Need To Know
Beginner sewers often don't give
much thought to stitch length when they start sewing. Generally, default stitch
lengths can be used for sewing, whether it's set on the dial of a mechanical
machine or programmed on a computerized machine. This isn't necessarily a bad
thing! It's a good starting point for most beginner projects. However, as you
gain more experience, you may want to adjust stitch length based on the fabric
being used and the purpose of the stitch. Here are some embroidery digitizing basic knowledge about
stitch length that you may find useful:
What is stitch length?
Stitch length usually refers to the length of the stitches sewn by a sewing machine in one stitch cycle.
Changing the stitch length can affect the feed dogs and control how much fabric is pulled with each stitch. Shorter stitch lengths sew through less fabric, while longer stitch lengths sew through more fabric.
What do the numbers on stitch length control indicate?
In most modern sewing machines, needle length control displays the length of a single stitch in millimeters. For example, a needle length of 3.0 indicates a stitch length of 3 millimeters (slightly less than 1/8 inch). Typically, needle length ranges from 0 to 5, but some machines can reach 7, depending on the sewing machine model and settings.
Older sewing machines may display needle length as stitches per inch, typically ranging from 4 to 60. This means that the larger the number, the shorter the stitch length (i.e., the more stitches per inch).
If you need to convert needle length from stitches per inch to millimeters or vice versa, you can use the following simple formulas:
Stitches per inch = 25.4 ÷ stitch length (in millimeters)
Stitch length (in millimeters) = 25.4 ÷ stitches per inch
Why do we need to change the length of the stitch?
There are several reasons to adjust the length of the stitch:
1. The stitch length affects the sewing speed, the strength of the seam, and the appearance of the stitch.
2. Different types of fabrics
require different stitch lengths to ensure that the seam is not too tight or
too loose.
3. Sewing different types of items
may require different stitch lengths, such as for oiled, leather, or sheer
fabrics.
4. The stitch length also affects
the tear strength of the seam, so the appropriate stitch length needs to be
selected based on the weight and thickness of the fabric.
5. Longer stitches can sew heavier
fabrics faster, while shorter stitches are more suitable for lightweight
fabrics or sewing curves.
6. Longer stitches can reduce the
number of holes punched in the fabric by the thread, while shorter stitches are
easier to sew smooth curves.
7. Finally, when choosing stitch
length, it is necessary to consider the possibility of having to tear the seam
in the future, as a stitch that is too short will make this process more
difficult.
How to adjust the stitch length
The method for adjusting the stitch length varies depending on the type of sewing machine.
1. For basic sewing machines such as Janome 10 Stitch, you can select the appropriate stitch length from the available needle plates, as each needle plate has a fixed length.
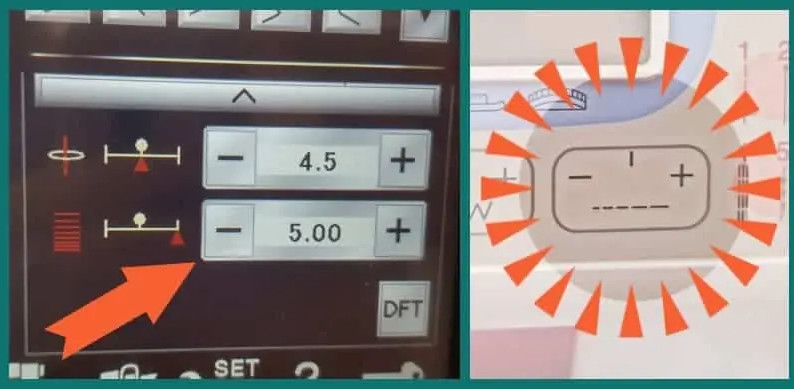
2. For non-computerized mechanical sewing machines, there is usually a dial or a dashed line on the front of the sewing machine labeled "Length" with short and long dashes where you can select the desired stitch length.
3. For computerized sewing machines, you can increase or decrease the stitch length by pressing buttons or selecting the corresponding options on the touch screen.
What stitch length should I use?
Here are some guidelines for the best stitch length to use in different situations:
Note: These are guidelines. Always
test your stitch length on a piece of fabric before sewing and make necessary
adjustments based on your preferences and requirements, including fabric and
thread selection.
What causes uneven stitches?
There are many reasons why stitches may be uneven. If your stitches look uneven, you can check the following:
First, check if you are stretching the fabric too much, rather than letting the feed dogs pull it naturally. Beginners often make this mistake. Try not to put your hand under the needle while sewing and forcibly pull the fabric. Let the feed dogs work naturally.
Second, if the pressure of the presser foot is too low, the feed dogs may not be able to grip the fabric well. You can increase the pressure of the presser foot to solve this problem (check the manual for how to do this).
Third, loose thread tension can cause uneven stitching. Check that the thread is threaded correctly through the tension disc, and increase the tension.
Fourth, check that the thread in the bobbin is threaded correctly.
Finally, try changing the needle.
Overall, the correct needle length is crucial to sewing quality. Depending on your sewing project and materials, you can adjust the needle length to achieve the desired results. For beginners, mastering the correct needle length may require some practice and adjustment, but with experience, you will become more confident in using different needle lengths in sewing. If you have any questions or confusion, remember to refer to your sewing machine manual or seek help from professionals to ensure the best results for your sewing project.


