What Is Embroidery Digitizing? A Stitch-by-Stitch Guide
Welcome to the World of EmbroideryDigitizing
Embroidery
has always been a timeless art form, one that has allowed us to add flair and
personality to fabrics for centuries. It’s a tradition that has woven its way
through cultures and generations, giving clothing, accessories, and household
items a personal touch. But in today’s digital age, embroidery has evolved into
something even more fascinating: embroidery digitizing. By integrating
technology, this art form has opened up a world of new possibilities for
artists, crafters, and businesses alike. Whether you're a hobbyist eager to
explore this modern twist or a professional looking to enhance your skills,
you're in the right place. This article will guide you through the entire
journey of embroidery digitizing, unraveling its complexities and making it
easy for you to grasp. You’ll discover how to take a creative spark and
transform it into a digital masterpiece, bridging the gap between traditional
stitching and cutting-edge technology.
Why
This Guide Will Transform Your Understanding
Embroidery digitizing isn’t just about turning a design into
thread—it’s about infusing creativity with technology to craft intricate,
personalized works of art. It’s about pushing the boundaries of what’s possible
with thread and needle, expanding the canvas of embroidery into the digital
realm. This guide will transform the way you see embroidery, helping you unlock
new possibilities. By the end of this read, you’ll have a solid understanding
of what embroidery digitizing is, how it works, and how to apply it to your projects.
Whether you’re looking to create logos, custom patterns, or even one-of-a-kind
gifts, you’ll be equipped with the knowledge and confidence to embark on your
digitizing journey. It’s time to discover the magic behind the pixels and
stitches and unleash your creativity like never before.
What
Is Embroidery Digitizing?
The Basics: From Traditional Stitching to Digital Art
The
process of transforming a design into a format that an embroidery machine can
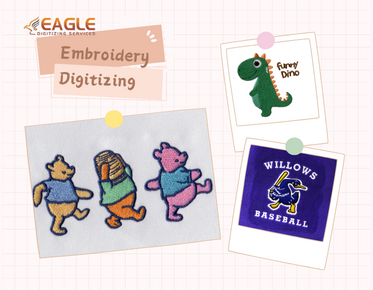
read and sew out is the fundamental component of embroiderydigitization. Traditionally, embroidery was done by hand, each stitch
meticulously placed to create a pattern, making it a labor-intensive art form.
However, digitizing takes this process to the digital realm, allowing artists
to quickly and accurately create complex designs. Using specialized software,
artists now transform logos, images, or sketches into digital files that
machines can then interpret and sew onto fabric. This process involves
assigning stitch types, directions, and densities, essentially programming a
machine to replicate the artwork with precision. It’s the perfect blend of
old-school artistry and modern technology, where manual labor meets automation,
and creativity is captured in a digital format.
How It Bridges Creativity and
Technology
Embroidery
digitizing is where imagination meets precision. It’s a harmonious fusion of
creativity and technical expertise, where artists can take a simple drawing
and, through the magic of digital tools, turn it into a piece of fabric art.
The ability to control every element of the stitch—its type, size, and
direction—ensures that what was once a manual, painstaking task can now be
achieved in record time with flawless results. The technology behind digitizing
empowers artists to work faster, experiment with more intricate designs, and
achieve greater consistency. Whether it’s a logo that needs to be scaled or a portrait
with hundreds of colors, digitizing allows for an unmatched level of detail and
precision. This fusion of creativity and technology has revolutionized how we
approach design, making embroidery more accessible, versatile, and professional
than ever before.
Why
Embroidery Digitizing Matters
The Evolution of Embroidery in a Digital Age
Gone are the days when intricate, multi-colored designs required hours
of handwork. With embroidery digitizing, you can achieve complex designs that
once seemed impossible to replicate by hand. The rise of digital technology has
made it easier, faster, and more efficient, which is why it has quickly become
the go-to method for both hobbyists and professionals. Digital embroidery also
offers the opportunity to make changes and revisions to designs quickly, a
feature that was unimaginable in the days of manual stitching. In a world where
speed and precision matter, embroidery digitizing stands out as a game-changer.
It opens up endless creative possibilities while reducing the time and effort
traditionally required for embroidery, making it ideal for both personal and
commercial use.
The Growing Demand for DigitizedDesigns
As
technology advances, the demand for customized and detailed embroidery has
skyrocketed. From personalized gifts to branded apparel, businesses and
individuals alike are turning to embroidery digitizing to
create their unique pieces. Customization has become the driving force behind
many industries, allowing businesses to provide tailored solutions and products
that resonate with their customers. The ability to digitize intricate logos,
designs, and even text has made it possible to turn any concept into reality,
regardless of its complexity. Whether you're creating unique company
merchandise, offering personalized gifts, or enhancing a brand's identity,
embroidery digitizing ensures that your designs are sharp, professional, and
ready for production. As the industry grows, the need for skilled digitizers
continues to increase, making this an essential skill to master for those
looking to stay ahead in the world of embroidery.
The
Process of Embroidery Digitizing
From Concept to Creation: An
Overview
Embroidery
digitizing begins with a vision—a logo, a pattern, or an artwork that needs to
be stitched onto fabric. Once you have your idea, you move to the next step:
transferring that idea into a digital format. The software takes the design and
assigns stitch types, directions, and densities to create a file that can be
read by embroidery machines. It’s a process that blends both artistic flair and
technical knowledge, where creativity is translated into precise instructions
that guide the embroidery machine. The process doesn’t stop at just creating
the file—testing, adjustments, and fine-tuning are essential to ensure that the
design translates beautifully onto fabric. This combination of artistry and
technology results in a final product that’s not just a design, but a work of
art.
The Essential Tools You’ll Need
Before
diving into digitizing, you’ll need a few key tools. The most essential of
these is embroidery digitizing software, which allows you to manipulate designs
and convert them into machine-readable formats. Popular software options
include Adobe Illustrator (when paired with embroidery plug-ins), CorelDRAW,
and dedicated embroidery software like Wilcom and Hatch.
These programs come equipped with powerful features that allow you to adjust
stitch patterns, tweak densities, and control color palettes, making it easier
to craft your ideal design. You’ll also need an embroidery machine capable of
reading digitized files. Depending on your needs, you can opt for a home
machine or an industrial-grade model. Lastly, a computer, high-quality threads,
and appropriate fabrics are necessary to ensure the best results. The right
combination of tools and software will make your digitizing experience both
enjoyable and professional.
Key
Components of a Digitized Design
Understanding Stitch Types: Run, Satin, and Fill
Every
stitch in embroidery has a specific purpose, and the type of stitch you choose
can drastically affect the look and feel of your design. The most common types
include run stitches (simple, straight stitches used for outlines), satin
stitches (tighter stitches that create smooth, glossy lines), and fill stitches
(used to cover larger areas). Each stitch type has its own characteristics and
is best suited to different types of designs. Run stitches are typically used
for fine details or outlining smaller elements, while satin stitches add depth
and shine to borders and lettering. Fill stitches are used for larger sections,
adding texture and dimension to the design. Understanding when and how to use
each type is crucial for creating professional-quality designs that are not
only visually appealing but also durable and practical.
The Role of Density and Underlay
in Quality Stitching
Density
refers to how tightly the stitches are packed together, which directly affects
the design’s appearance and durability. An ideal density creates a clean, sharp
design that doesn’t look too heavy or too sparse. Too much density can cause
the fabric to pucker, while too little can lead to an incomplete design that
doesn’t stand out. Underlay stitches, on the other hand, are the foundation
stitches placed beneath the main design to help stabilize the fabric and
prevent puckering. These stitches provide a smooth surface for the top stitches
to sit on, ensuring that the design doesn’t distort or shift during stitching.
Together, these elements ensure your final product is as high-quality as
possible, resulting in a sharp, professional finish.
Tools
of the Trade
Exploring Embroidery Digitizing Software Options
There’s
a wide variety of embroidery digitizing software available, each with its
strengths. For beginners, software like Hatch or SewArt is user-friendly and
feature-rich, offering templates and auto-digitizing tools to help speed up the
process. These tools are perfect for those who are just starting and need a
little extra guidance. For professionals, software like Wilcom or Pulse
provides more advanced features, allowing for more control over stitch types,
density, and design manipulation. These programs offer greater customization
and precision, making them ideal for those working on complex projects or for
clients who demand high-quality, detailed embroidery. Regardless of which
software you choose, it’s important to find one that suits your skill level and
project needs.
Hardware Essentials: Computers, Machines, and Accessories
A
reliable computer with sufficient processing power is a must when working with
embroidery software. As embroidery designs become more intricate, the need for
processing speed and storage capacity grows. For the machine, industrial
embroidery machines like the Brother or Bernina brands are top choices for
professionals, offering precision and the ability to handle large-scale
projects. However, for smaller, personal projects, home machines like the Janome
or Singer can also do the job, providing affordability and versatility.
Accessories such as stabilizers, needles, and threads also play an essential
role in the outcome of your design. High-quality stabilizers ensure that the
fabric holds its shape during stitching, while the right needles and threads
guarantee a clean, professional result. Together, these tools create the
foundation for successful embroidery digitizing.
Understanding
File Formats
Common Embroidery File Types Explained
Embroidery
machines rely on specific file formats to read and execute designs. Some common
formats include.DST, .PES, EXP, and . JEF, each compatible with different
brands and models of machines. These file types store the stitch information,
ensuring that the design will be sewn exactly as intended. Each file type has
its own set of specifications, meaning you must choose the correct format based
on your machine’s requirements. Understanding these formats is essential for
ensuring smooth execution and avoiding errors during the embroidery process.
It’s important to choose the right format for the machine you're using to
ensure the best possible results.
Converting and Exporting Files
for Your Machine
Once you’ve created your design, you’ll need to export it in a format that your embroidery machine can read. Many embroidery digitizing software programs come with built-in tools to convert your design into the correct file type. However, if you’re working with multiple types of machines or need to convert files for different platforms, using a file converter tool might be necessary. These tools can help you ensure that your designs are compatible with different machines and formats, making it easier to work with multiple clients or projects. Always double-check that the converted file is correct before starting the embroidery process to avoid wasting time and materials.


