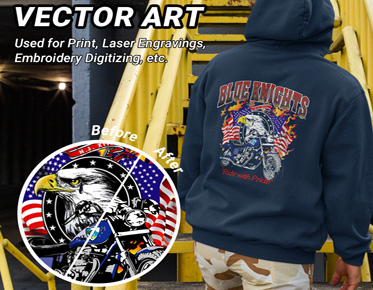
Unleash Creativity: Tips on Creating Vectors from Scratch
Are you ready to
unleash your creativity and dive into the world of vector art? Creating vectors from scratch might seem daunting, but
with the right tips and techniques, you’ll be crafting stunning designs in no
time. In this article, we’ll walk you through essential steps to help you
master the art of vector creation, from choosing the right tools to understanding
basic shapes. Whether you’re a complete beginner or looking to sharpen your
skills, these tips will set you on the path to vector mastery!
Getting Started: Setting Up Your Workspace
Creating
an Efficient Workspace for Vector Design
An efficient
workspace is crucial for nurturing creativity. Clear clutter, ensuring your
design software is easily accessible, and maintaining an organized digital
filing system can significantly enhance your workflow. Consider dual monitors
if your budget allows; they can dramatically increase productivity by giving
you ample space to work on your designs while referencing other materials or
tutorials.
Essential
Tools and Features to Familiarize Yourself With
Before diving in,
familiarize yourself with the fundamental tools of your chosen software. Brush
up on the pen tool, shape tools, and pathfinder functions. Understanding
features like layers and grids will help you navigate the design landscape with
confidence. The more comfortable you are with these tools, the more seamless
your creative process will become.
Sketching Your Ideas
Why
Hand-Drawn Sketches Can Elevate Your Vectors
Before digitizing
your vision, put pencil to paper. Hand-drawn sketches act as a powerful
catalyst for creativity, allowing you to explore ideas without the constraints
of software. They provide an organic flow, encouraging spontaneity that often
gets lost in digital formats. Plus, the tactile experience of sketching can
spark inspiration and bring a unique flair to your designs.
Tips
for Creating Rough Drafts Before Digitization
When sketching,
don’t aim for perfection. Focus on capturing the essence of your idea. Use
loose lines and shapes to convey movement and composition. Consider creating
multiple drafts to explore variations and refine your vision. Remember, these
sketches are the backbone of your final design—nurture them with care.
Using Basic Shapes as Building Blocks
The
Power of Shapes: Starting Simple
At the heart of
vector design lies the fundamental principle: shapes. Circles, squares, and
triangles serve as the building blocks for more complex designs. By starting
simple, you can lay a solid foundation, allowing for a smooth transition into
intricate compositions. Think of shapes as your design’s DNA, creating a robust
structure that supports your artistic expression.
How
to Combine Shapes for Complex Designs
Once you’ve
established your basic shapes, the real fun begins! Use the pathfinder tools to
combine, subtract, or intersect shapes. This technique opens up a world of
possibilities, allowing you to create intricate designs by simply manipulating
your foundational elements. Experimentation is key; play around with different
combinations to discover new forms and aesthetics.
Mastering the Pen Tool
Understanding
the Pen Tool: Your Best Friend in Vector Design
The pen tool is
your trusted ally in the world of vector graphics. It allows for unparalleled
precision, enabling you to create smooth curves and sharp angles. Although it
may seem daunting at first, mastering the pen tool unlocks endless creative
possibilities. Embrace its quirks and features, and you’ll soon find yourself
navigating it with finesse.
Tips
for Creating Smooth Curves and Sharp Angles
To create smooth
curves, practice drawing with a gentle hand, allowing the anchor points to
guide your path. Adjust handles to refine curves and achieve that fluid motion
you’re after. For sharp angles, click and release to create straight lines,
ensuring your paths maintain their defined edges. With practice, you’ll develop
the ability to control every curve and corner effortlessly.
Working with Color
Choosing
the Right Color Palette for Your Vectors
Color is the
lifeblood of any design. Selecting a cohesive color palette can elevate your
vectors from mundane to magnificent. Consider your theme and audience when
choosing colors; use tools like Adobe Color or Coolors to help find harmonious
combinations. Don’t shy away from bold choices—color can convey emotion and
energy, making your designs resonate.
Understanding
Color Modes: RGB vs. CMYK
Understanding
color modes is essential for achieving the right visual impact. RGB (Red,
Green, Blue) is the go-to mode for digital screens, while CMYK (Cyan, Magenta,
Yellow, Key/Black) is designed for print. Always consider your end use; if your
design is destined for print, converting to CMYK before saving ensures that
colors appear as intended.
Creating and Editing Paths
How
to Manipulate Paths for Precision
Paths are the
backbone of vector graphics, and knowing how to manipulate them is crucial.
Utilize anchor points to adjust the shape and curvature of your paths. By
selecting individual points, you can fine-tune details and achieve the
precision necessary for professional-quality designs. Experiment with different
path operations to see how they affect your overall composition.
Using
Anchor Points Effectively: A Step-by-Step Guide
To work with
anchor points effectively, start by selecting the direct selection tool. Click
on an anchor point to reveal handles that control curvature. Dragging these
handles allows you to adjust the angle and arc of your path. For tight curves,
use fewer anchor points to maintain smoothness, while more complex shapes may
require additional points for detail. Practice manipulating anchor points
regularly to become comfortable with this essential skill.
Adding Text to Your Vector Designs
Best
Practices for Integrating Typography
Typography can
elevate your design, adding personality and flair. When integrating text,
choose fonts that complement your overall theme. Ensure readability by
selecting appropriate sizes and weights. Pair contrasting fonts for a dynamic
look, and pay attention to kerning and line spacing for a polished finish.
How
to Convert Text to Outlines for Scalability
To ensure your
typography remains consistent across platforms, convert text to outlines. This
process transforms your text into vector shapes, preserving the design even if
the font isn’t available. In most design software, simply select the text,
navigate to the “Type” menu, and choose “Create Outlines.” This step guarantees
that your text will look impeccable, no matter where it’s displayed.
Incorporating Patterns and Textures
How
to Use Patterns to Add Depth to Your Vectors
Patterns can
breathe life into your vector graphics, adding visual interest and depth.
Experiment with geometric shapes, florals, or stripes to create a unique
aesthetic. Use the pattern tool in your software to seamlessly apply these
elements, ensuring they enhance rather than overwhelm your design.
Exploring
Textures: Creating a Unique Look for Your Designs
Textures can
transform flat designs into dynamic visuals. Consider incorporating textures
like wood grain, fabric, or paper to create depth and character. You can
achieve this by layering images or using brushes and effects within your
software. The subtle inclusion of textures can elevate your work, making it
stand out in a crowded digital landscape.
Understanding Layers
The
Importance of Layering in Vector Design
Layers are the
unsung heroes of vector design, allowing for organization and flexibility. By
separating different elements into layers, you can work on individual parts
without disrupting the entire composition. This technique is especially useful
for complex designs, where multiple components need attention.
How
to Organize Layers for Better Workflow
To maximize
efficiency, develop a consistent layering system. Name your layers
descriptively, and group similar elements together. Color-coding layers can
also aid in quick identification. A well-organized layer structure streamlines
your workflow, making it easier to navigate and edit your designs.
Shadows and Highlights: Adding Dimension
Techniques
for Creating Realistic Shadows and Highlights
Shadows and
highlights are essential for creating depth and realism in vector designs.
Experiment with gradients and transparency to simulate light and shadow
effects. Soft, diffused shadows add a gentle touch, while sharp shadows convey
drama and intensity.
Using
Gradients to Enhance Your Vector Graphics
Gradients can
transform flat colors into visually captivating elements. Use linear or radial
gradients to create smooth transitions, enhancing the perception of depth.
Incorporate gradients strategically, focusing on areas where light naturally
interacts with your shapes. The careful application of gradients can elevate
your designs to a professional standard.
Exporting Your Vectors
Choosing
the Right Format for Different Uses
Exporting
your vectors in the correct format is crucial for achieving the best results across
different mediums. For web use, SVG is often preferred due to its scalability.
For print, consider formats like EPS or PDF to maintain quality. Always
double-check your settings to ensure the best outcome for your specific
application.
How
to Prepare Your Vectors for Print and Web
When preparing
your vectors, consider your target medium. For print, ensure that your color
settings are in CMYK and that your resolution is high enough (typically 300
DPI). For the web, use RGB color settings and compress your files for faster
loading times. This attention to detail will ensure that your designs shine,
regardless of where they are displayed.
Common Mistakes to Avoid
Top
Pitfalls in Vector Creation and How to Avoid Them
In the journey of
vector creation, some common pitfalls can hinder
your progress. Overcomplicating designs can lead to confusion and clutter,
while neglecting to organize layers may create chaos. Always strive for clarity
and simplicity; less is often more in the realm of vectors.
Tips
for Reviewing Your Work Before Finalizing
Before finalizing
your design, take a step back and review your work. Zoom in and out to examine
details and overall composition. Consider seeking feedback from peers or online
communities; fresh eyes can spot issues you may have overlooked. A thorough review
process ensures your final product is polished and professional.
Practicing Your Skills
Creative
Exercises to Hone Your Vector Creation Skills
The key to
mastering vector creation lies in practice. Engage in creative exercises that
challenge your skills. Try recreating existing vector designs to understand
techniques and tools. Consider setting up personal projects or collaborating
with fellow designers to keep your skills sharp and fresh.
How
to Challenge Yourself with New Projects
Challenge
yourself by exploring different styles or subject matter. If you typically work
with minimalism, try your hand at intricate designs, or switch to a different
color palette. Embracing new challenges fosters growth and keeps your creative
spirit alive.
Getting Feedback and Critique
The
Importance of Seeking Constructive Criticism
Feedback is a
powerful tool for growth. Seeking constructive criticism can help identify
areas for improvement and refine your skills. Engage with fellow designers or
join online communities where feedback is encouraged.
How
to Use Feedback to Improve Your Skills
Keep an open mind
when you get criticism. Analyze the critiques and consider how they align with
your vision. Implement suggestions that resonate with you while staying true to
your style. This balanced approach will enhance your work while maintaining
your unique artistic voice.
Embarking on the journey of vector creation is an exciting adventure filled with endless possibilities. Embrace the learning process, and don’t be discouraged by initial challenges. Each step you take is a building block toward becoming a skilled vector artist. So, grab your software, unleash your creativity, and let your vector journey begin!


