Common Terminology in Embroidery Digitizing: Your Essential Glossary
Embroidery digitizing opens the door to a vibrant universe of creativity and craftsmanship. With just a few clicks, digital designs transform into beautiful, stitched art, breathing life into textiles. Whether it’s a logo on a corporate shirt or a unique design on a tote bag, understanding the intricacies of embroidery digitizing is key to mastering this art form. The journey begins with familiarizing oneself with the terminology that underpins this craft. Knowing the lingo can be the difference between frustration and success.
Why Understanding Terminology Matters for Success
In the realm of embroidery digitizing, terminology acts as a roadmap. Grasping the language not only enhances communication with peers but also equips you to navigate the software and troubleshoot issues effectively. Each term carries significance, dictating how designs are created and executed. By embracing this lexicon, you’ll find yourself more adept at making informed decisions, ultimately elevating your work to a professional standard.
Key Terms in Embroidery Software
Embroidery Software: What It Is and How It Works
Embroidery software serves as the backbone of the digitizing process. It is the tool that transforms artistic visions into stitchable designs. These programs allow users to manipulate shapes, colors, and stitch types, creating detailed embroidery files that machines can read. From user-friendly interfaces to complex editing tools, embroidery software can vary widely, catering to both novices and seasoned pros alike.
File Formats: PES, DST, and Others Explained
File formats are a crucial aspect of embroidery digitizing, as they dictate how designs are stored and processed. PES (for Brother machines) and DST (for Tajima machines) are two of the most commonly used formats. PES files offer rich information, including thread colors and stitch types, while DST files focus solely on stitching instructions, resulting in smaller file sizes. Familiarity with various formats ensures that designs remain compatible with different machines and software, streamlining the production process.
Toolbars and Menus: Navigating Your Software
Navigating embroidery software can feel daunting at first. However, familiarizing yourself with toolbars and menus is essential for efficient workflow. Each toolbar typically houses a range of functions, from selecting stitch types to adjusting thread colors. Taking time to explore these features can lead to a more intuitive understanding of the software, empowering you to maximize its capabilities.
Stitch Types: The Building Blocks of Embroidery
Satin Stitch: Glossing Over the Basics
The satin stitch is a favorite among digitizers for its elegant finish and versatility. Characterized by its smooth, glossy appearance, this stitch is ideal for outlining and lettering. When applied correctly, satin stitches can create a luxurious look that adds depth and dimension to designs. The key to mastering satin stitches lies in selecting the appropriate density and width, ensuring they are neither too sparse nor overly tight.
Fill Stitch: Filling Your Designs with Style
Fill stitches breathe life into embroidery, covering larger areas with a rich texture. These stitches can vary in density, allowing for creative shading and design variation. From simple geometric shapes to complex images, fill stitches provide the foundation for visually striking pieces. Experimenting with different fill patterns can yield unique effects that enhance the overall aesthetic.
Running Stitch: The Versatile Workhorse
Often regarded as the unsung hero of embroidery, the running stitch is both simple and effective. It consists of a series of straight stitches, making it perfect for outlines, details, and even lettering. Its adaptability means it can be used in various designs, from delicate line art to bold statements. The running stitch is also less thread-intensive, making it a practical choice for budget-conscious projects.
Advanced Stitch Techniques
Underlay Stitch: The Foundation of Quality
Underlay stitches serve as the unsung foundation for successful embroidery. Positioned beneath the primary stitches, they stabilize the fabric and provide support. Underlay techniques vary depending on the fabric and design complexity, with options such as zigzag, double zigzag, and straight stitches. Implementing the right underlay ensures that your design holds its shape and enhances the overall stitch quality.
Appliqué Stitch: Adding Layers and Textures
Appliqué is a captivating technique that adds texture and dimension to embroidery projects. It involves sewing one piece of fabric onto another, often creating stunning designs with contrasting colors and textures. Appliqué stitches can be outlined with satin or zigzag stitches, giving a polished finish. This technique is perfect for adding intricate details and elevating the visual appeal of your designs.
Specialty Stitches: When and How to Use Them
Specialty stitches add a unique flair to embroidery, allowing for creative expression and originality. These stitches range from decorative techniques like French knots to more complex options like leaf or flame stitches. Understanding when and how to incorporate specialty stitches can elevate your designs, making them stand out from the crowd. Experimenting with various specialty stitches can lead to exciting discoveries and innovative creations.
Understanding Design Elements
Vector vs. Raster Graphics: What’s the Difference?
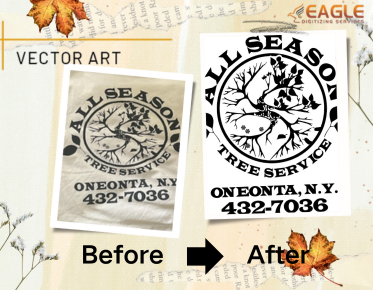
Understanding the difference between vector and raster graphics is pivotal in embroidery digitizing. Vector graphics, composed of paths defined by mathematical equations, can be resized without losing quality, making them ideal for embroidery. In contrast, raster graphics are pixel-based, leading to potential quality loss when resized. For optimal embroidery results, prioritize vector graphics, as they provide crisp, clean lines that stitch perfectly.
Design Density: How Stitch Count Affects Quality
Design density refers to the number of stitches within a given area and directly impacts the quality of the finished product. High-density designs can lead to a stiff finish, while low-density designs may lack coverage. Striking the right balance is essential for achieving both a polished appearance and functional embroidery. As a general rule, a density of 8-10 stitches per millimeter works well for most designs, but adjustments may be necessary based on the fabric and design complexity.
Placement and Sizing: Key Considerations for Every Project
Placement and sizing are vital components of successful embroidery projects. A well-placed design enhances the garment’s overall aesthetic and draws attention to key elements. Additionally, proper sizing is crucial; designs that are too small can lose detail, while those that are too large may distort or misalign during stitching. Taking time to plan placement and sizing ensures a polished, professional finish.
Fabric and Material Terminology
Stabilizers: Why They Matter for Quality
Stabilizers are the unsung heroes of quality embroidery. They provide support and structure to the fabric, preventing distortion and ensuring clean, crisp stitches. Different types of stabilizers—such as tear-away, cut-away, and wash-away—serve various purposes, depending on the fabric and design. Understanding which stabilizer to use for each project is essential for achieving optimal results.
Hooping: Techniques for Proper Fabric Management
Hooping is the technique of securing fabric in an embroidery hoop, and proper technique is essential for avoiding issues during the stitching process. A well-hooped fabric prevents puckering, shifting, and misalignment. Techniques such as the “tug test” help ensure that the fabric is taut yet not overstretched, allowing for precise stitching and a professional finish.
Common Fabrics Used in Embroidery: A Quick Guide
Familiarity with common fabrics used in embroidery can streamline the design process. Cotton, polyester, denim, and canvas are popular choices, each offering unique characteristics. Cotton is soft and easy to work with, while polyester offers durability and vibrant colors. Understanding how each fabric behaves during stitching can inform decisions about design choices, stabilizers, and thread types.
Color and Thread Essentials
Thread Types: Rayon, Polyester, and More
Selecting the right thread type is crucial for achieving the desired results. Rayon threads are known for their shine and color vibrancy, making them a popular choice for decorative embroidery. However, polyester threads offer superior strength and durability, making them ideal for high-wear items. Understanding the pros and cons of different thread types can inform choices based on the project’s requirements.
Color Palettes: Choosing the Right Colors for Your Design
A well-thought-out color palette can elevate your embroidery design to new heights. Selecting harmonious colors that complement one another enhances visual appeal and creates a cohesive look. Experimenting with various color combinations allows for creative expression while ensuring that the final product is aesthetically pleasing. Color palettes can also be informed by trends, themes, or the intended message of the design.
Color Theory in Embroidery: Understanding Harmony and Contrast
Color theory plays a pivotal role in embroidery digitizing, guiding decisions on color choices and combinations. Understanding concepts such as complementary colors, analogous colors, and triadic schemes can enhance design impact. Utilizing contrast effectively draws attention to specific elements, while harmony creates a sense of unity. By applying color theory principles, designs can achieve a professional and polished finish.
Common Challenges and Solutions
Thread Tension: What It Is and How to Adjust It
Thread tension refers to the tightness of the thread as it passes through the needle and fabric. Proper tension is crucial for achieving smooth, even stitches. If the tension is too loose, stitches may appear sloppy; if too tight, they can lead to thread breaks. Adjusting tension settings on your embroidery machine is essential for troubleshooting and achieving optimal results.
Needle Types: Choosing the Right One for Your Fabric
Selecting the appropriate needle type is vital for successful embroidery. Needle kinds vary depending on the fabric; ballpoint needles work well for knits and sharp needles work well for woven materials. Choosing the wrong needle can result in damaged fabric or poor-quality stitching. Familiarity with needle types and their applications is crucial for navigating potential challenges.
Troubleshooting Common Issues: Thread Breaks and Snags
Thread breaks and snags can be frustrating hurdles in the embroidery process. Common causes include improper tension, incorrect needle choice, or low-quality thread. Addressing these issues promptly can prevent further complications. Regular maintenance of the embroidery machine, including cleaning and lubrication, can also help mitigate these common problems.
Quality Control Terms
Quality Assurance: Ensuring Consistent Results
Quality assurance is the backbone of professional embroidery digitizing. Establishing a quality assurance process ensures that every design meets consistent standards. This involves regular checks throughout the digitizing process, from initial design to final production. Implementing quality control measures promotes reliability and fosters trust with clients and customers.
Final Checks: Key Elements Before Production
Before sending designs into production, conducting final checks is paramount. Review each design element, ensuring that stitches, colors, and placements are correct. A thorough inspection helps catch potential issues before they escalate, preventing costly mistakes. Final checks create confidence in the quality of the finished product.
Review Process: Getting Feedback on Your Work
In the pursuit of excellence, seeking feedback is invaluable. Engaging in a review process allows for constructive criticism and insights from peers. This collaborative approach fosters growth and encourages new ideas, ultimately enhancing the quality of the work. Regularly reviewing designs with trusted colleagues can lead to improved techniques and results.
Embroidery digitizing is a captivating journey filled with endless learning opportunities. Embrace the intricacies of terminology, techniques, and design principles as you navigate this dynamic craft. Continuous learning is the key to growth, ensuring that each project enhances your skills and creativity.
As you delve deeper into the world of embroidery digitizing in USA, embrace the art form with enthusiasm and curiosity. With each design, refine your techniques, expand your knowledge, and elevate your craft. The journey ahead is ripe with possibilities, waiting for you to explore and conquer!


