Level Up: Top 5 Tips to Improve Vector Art Digitizing Skills
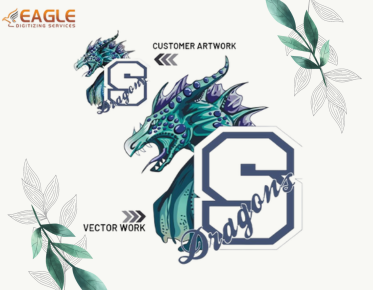
In the realm of digital design, vector art stands as a pillar of precision and versatility. Unlike raster images that blur when resized, vector graphics retain their sharpness and clarity at any scale. This unique characteristic makes vector art indispensable for various applications, from logo creation to intricate illustrations. Enhancing your vector art digitizing skills not only broadens your creative horizons but also bolsters your professional repertoire.
Tip 1: Master the Pen Tool
Why the Pen Tool is Your Best Friend
The pen tool is the cornerstone of vector art. It allows you to create precise paths and shapes, giving you control over every aspect of your design. Mastering the pen tool is crucial for producing professional-quality vector graphics.
Basic Functions and Shortcuts
Familiarize yourself with the basic functions of the pen tool. Learn how to place anchor points, create curves by dragging handles, and close paths to form shapes. Shortcuts like holding the Shift key to constrain angles or using the Alt key to adjust handles independently will speed up your workflow.
Creating Smooth Curves and Perfect Lines
To create smooth curves, place anchor points sparingly and use handles to adjust the curvature. The fewer points you use, the smoother your lines will be. Practice creating shapes with clean, flowing curves to develop a steady hand and precise control.
Common Mistakes and How to Avoid Them
Common mistakes include placing too many anchor points and creating jagged lines. Avoid these pitfalls by zooming in and working carefully. Adjust handles to refine your curves and delete unnecessary points to maintain smooth paths.
Tip 2: Optimize Your Workflow
Setting Up Your Workspace for Efficiency
An organized workspace enhances productivity. Arrange your tools and panels for easy access, customize shortcuts, and use dual monitors if possible. A clutter-free environment helps maintain focus and streamline your creative process.
Utilizing Layers and Groups for Better Organization
Layers and groups are essential for managing complex designs. Use layers to separate different elements, making it easier to edit specific parts without affecting the entire design. Group related objects to move and transform them collectively, enhancing organization and efficiency.
Keyboard Shortcuts to Speed Up Your Work
Keyboard shortcuts can significantly speed up your workflow. Learn the shortcuts for common actions like selecting tools, duplicating objects, and undoing actions. Customizing your shortcuts to suit your working style can further enhance efficiency.
Saving and Exporting: Best Practices
Save your work frequently to avoid losing progress. Use versioning to keep track of changes, and export your files in appropriate formats for their intended use. For web graphics, export as SVG or PNG; for print, use PDF or EPS.
Tip 3: Improve Your Tracing Techniques
Starting with a High-Quality Sketch
A high-quality sketch is the foundation of effective tracing. Ensure your initial drawing is clean and detailed, providing a clear guide for your vector work. Scan or photograph your sketch at a high resolution to capture all the nuances.
Techniques for Manual Tracing
Manual tracing involves placing anchor points along the contours of your sketch. Use the pen tool to follow the lines, adjusting handles to replicate curves accurately. Take your time to ensure precision, as this forms the basis of your vector image.
Using Auto-Trace Features: When and How
Auto-trace features can speed up the process but often require manual refinement. Use auto-trace for simpler shapes or as a starting point for more complex designs. After tracing, adjust the paths and anchor points to clean up the results.
Refining Paths for Cleaner Results
Refining paths involves smoothing out curves and aligning points precisely. Use tools like the smooth tool or the simplify command to reduce unnecessary points. Continuously zoom in and out to ensure your paths are clean and accurate.
Tip 4: Perfecting Strokes and Fills
Understanding Stroke and Fill Properties
Strokes and fills are fundamental to vector art. Strokes define the outline of shapes, while fills add color or patterns to the interior. Understanding how to manipulate these properties is crucial for creating visually appealing designs.
Creating Custom Brushes and Patterns
Custom brushes and patterns can add a unique touch to your artwork. Experiment with different brush shapes and patterns to find ones that complement your style. Save your favorites for easy reuse in future projects.
Using Gradients to Add Depth and Dimension
Gradients can add depth and dimension to your vector art. Use linear or radial gradients to create smooth transitions between colors, adding realism and interest to your designs. Adjust opacity and blending modes for more complex effects.
Tips for Achieving Consistent Styles
Consistency is key in vector art. Use a limited color palette and maintain uniform stroke weights and styles across your design. Create and apply styles or graphic styles to ensure cohesiveness throughout your artwork.
Tip 5: Experiment with Advanced Features
Exploring Pathfinder and Shape Builder Tools
The Pathfinder and Shape Builder tools allow you to create complex shapes by combining and modifying simpler ones. Use these tools to intersect, subtract, and merge shapes, unlocking new creative possibilities and streamlining your workflow.
Creating Complex Shapes and Designs
Complex shapes can be created by layering and combining basic shapes. Experiment with different configurations and use the Pathfinder and Shape Builder tools to refine your designs. This approach can lead to intricate and unique artwork.
Working with Masks and Clipping Paths
Masks and clipping paths enable you to hide or reveal parts of your design. Use masks to create intricate cutouts and clipping paths to constrain artwork within specific shapes. These techniques add versatility and depth to your vector art.
Adding Textures and Special Effects
Textures and special effects can enhance the realism and appeal of your vector art. Use textured brushes, pattern fills, and effects like drop shadows and glows to add complexity and interest to your designs. Experiment with different combinations to achieve the desired look.
Practice Makes Perfect
Daily Exercises to Build Your Skills
Consistent practice is essential for improving your vector art skills. Set aside time each day to work on exercises, such as tracing simple objects, creating basic shapes, and experimenting with tools. This regular practice will help you build muscle memory and confidence.
Joining Design Challenges and Competitions
Participating in design challenges and competitions can push your skills to new heights. These events often have specific themes and constraints that encourage creative problem-solving. Engaging with the design community through these challenges can also provide valuable feedback and inspiration.
Recreating Famous Vector Art for Practice
Recreating famous vector art pieces is a great way to learn new techniques and understand the intricacies of professional designs. Analyze the original artwork, break it down into basic shapes, and try to replicate it using your vector tools. This exercise can help you develop a deeper understanding of vector art principles.
Learning from the Pros
Studying Techniques of Renowned Vector Artists
Renowned vector artists often have unique techniques that set their work apart. Study their portfolios, watch tutorials, and read interviews to gain insights into their creative process. Learning from the pros can inspire new approaches and elevate your own work.
Analyzing Popular Vector Artworks
Analyzing popular vector artworks can provide valuable lessons in composition, color theory, and technique. Break down these artworks into their fundamental elements and study how they come together to create a cohesive and compelling design.
Reverse Engineering Professional Designs
Reverse engineering involves deconstructing professional vector designs to understand how they were created. Open the artwork in your vector software and examine the layers, paths, and effects used. This process can reveal advanced techniques and inspire your own creative solutions.
Staying Updated with Trends and Tools
Following Industry Blogs and Tutorials
Keeping up with industry blogs and tutorials is essential for staying current with vector art trends and techniques. Websites like Behance, Dribbble, and Adobe’s blog offer a wealth of resources, including tutorials, case studies, and industry news.
Participating in Online Communities and Forums
Online communities and forums provide a platform for sharing your work, seeking feedback, and connecting with other vector artists. Joining these communities can help you stay motivated, gain new perspectives, and learn from the collective experience of other designers.
Attending Webinars and Workshops
Webinars and workshops offer opportunities for hands-on learning and interaction with industry experts. Attend these events to expand your skill set, stay updated with new tools and techniques, and network with other professionals in the field.
Common Pitfalls and How to Avoid Them
Overcomplicating Your Designs
Simplicity often leads to more effective designs. Avoid overcomplicating your vector art by focusing on clean lines, balanced compositions, and clear visual hierarchy. Simplify where possible to enhance readability and impact.
Ignoring the Importance of Color Theory
Color theory plays a crucial role in the effectiveness of your designs. Understanding how colors interact and using them strategically can enhance the visual appeal and emotional impact of your vector art. Study color theory principles and apply them thoughtfully.
Neglecting File Management and Backup
Proper file management and backup are essential for safeguarding your work. Organize your files systematically, use descriptive naming conventions, and back up your work regularly to avoid data loss and ensure easy retrieval.
Improving your vector art digitizing skills involves mastering the pen tool, optimizing your workflow, refining tracing techniques, perfecting strokes and fills, and experimenting with advanced features. These tips will elevate your designs and enhance your efficiency.
Improving your vector art digitizing skills is a rewarding journey that opens up endless creative possibilities. With dedication, practice, and a willingness to learn, you can master this versatile medium and create stunning, professional-quality designs.


.png)
