Vectorize Your Words: Unlock Creative Possibilities
The Power of Vector Text in Design
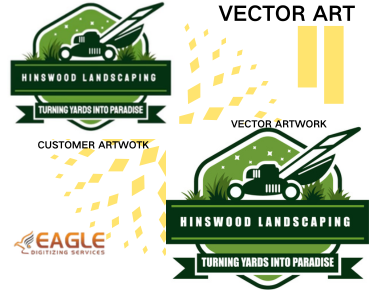
In the realm of design, vector text holds a significant place due to
its scalability and precision. Whether you're creating a logo, a banner, or any
other graphic element, vector text ensures that your design remains crisp and
clear, regardless of size. The ability to scale text without losing quality is
crucial for maintaining a professional and polished appearance across various
media. If this post spurred your
interest and you want to find out more about vector conversion, please feel free to contact us.
Why Vectorize Text? Benefits and
Applications
Vectorizing text transforms it from a pixel-based format to
one defined by mathematical equations, allowing for infinite scalability and
manipulation. This process is beneficial for numerous applications, including
print design, web graphics, and branding. Vector text is not only versatile but
also essential for maintaining brand consistency and ensuring high-quality
output in all formats.
Understanding
Vector Text
What is Vector Text?
Vector text is text that has been converted into vector format,
meaning it is made up of points, lines, and curves based on mathematical
equations rather than pixels. This allows the text to be scaled up or down
without any loss of quality, making it ideal for various design applications.
Key Differences Between Raster
and Vector Text
Raster text is pixel-based and can become blurry or pixelated when
resized. In contrast, vector text remains sharp and clear at any size. This
fundamental difference makes vector text preferable for designs that require
frequent resizing or high resolution, such as logos and print materials.
Advantages of Using Vector Text
in Your Projects
Using vector text in your projects offers several advantages:
●
Scalability: Resize without losing quality.
●
Editability: Easily modify individual elements.
●
Consistency: Maintain visual integrity across
different media.
●
Professionalism: Achieve a polished and refined
look.
Preparing
Your Text for Vectorization
Choosing the Right Font
Selecting the appropriate font is the first step in vectorizing text. Consider the aim of your design and
the message you wish to express. Ensure the font is readable and aligns with
your overall design aesthetic.
Ensuring Proper Text Alignment
and Spacing
Proper alignment and spacing are crucial for a clean vector design.
Ensure your text is well-aligned and spaced to avoid any distortions or
irregularities during the vectorization process.
Checking Text Quality and
Resolution
Start with high-quality text to achieve the best vector results. Ensure your text is clear and free of any distortions or pixelation. The high-resolution text makes the vectorization process smoother and more accurate.
Tools
for Vectorizing Text
Top Software Options for Text
Vectorization
Several software options are available for vectorizing text,
including:
●
Adobe Illustrator: Industry standard with robust
features.
●
CorelDRAW: User-friendly and powerful.
●
Inkscape: Free and open-source with essential
vector tools.
Free vs. Paid Tools: What’s Best
for You?
Free tools like Inkscape are excellent for beginners or those on a
budget, offering essential features for vectorization. Paid tools like Adobe
Illustrator provide advanced capabilities, and extensive support, and are ideal
for professional designers.
Essential Features to Look for
in Vector Software
When choosing vector software, look for features like precision control, advanced path manipulation, robust export options, and user-friendly interfaces. These features ensure you can create high-quality vector text efficiently.
Vectorizing
Text with Adobe Illustrator
Step-by-Step Guide to Adobe
Illustrator
- Open your text in Adobe Illustrator.
- Select the text with the Selection Tool.
- Go to "Type" in the menu and select "Create
Outlines."
- Adjust the anchor points and paths as needed.
Tips for Precision and Accuracy
Use Illustrator's advanced tools, such as the Pen Tool and Direct
Selection Tool, to fine-tune your vector text. Pay attention to anchor points
and paths to ensure precision.
Troubleshooting Common Issues in
Illustrator
Common issues include overlapping paths and incorrect anchor points. Use the Path Finder and Pen Tool to correct these issues, ensuring a smooth and clean vector text.
Using
CorelDRAW for Text Vectorization
Step-by-Step Guide to CorelDRAW
- Open your text in CorelDRAW.
- Select the text and convert it to curves (Ctrl+Q).
- Adjust the nodes and curves as necessary.
Advanced Techniques and Tips
Leverage CorelDRAW's advanced tools, such as the Shape Tool and Smart
Fill, to refine your vector text. Experiment with different techniques to
achieve the best results.
Benefits of Using CorelDRAW
CorelDRAW offers a user-friendly interface and powerful features, making it ideal for both beginners and professionals. Its robust tools and customization options allow for precise vectorization.
Inkscape
for Text Vectorization
Step-by-Step Guide to Inkscape
- Open your text in Inkscape.
- Select the text and convert it to path (Shift+Ctrl+C).
- Use the Node Tool to adjust the paths.
Tips for Beginners and Advanced
Users
Beginners can start with basic path adjustments, while advanced users
can utilize Inkscape's extensive extensions and plugins for more complex
vectorization tasks.
Free and Open-Source Advantages
As a free and open-source tool, Inkscape is accessible to everyone. It offers a wide range of features and a supportive community, making it a valuable resource for vector design.
Converting
Text to Vector: Manual Methods
Tracing Text by Hand: When and
How to Do It
Manual tracing is useful for custom fonts or intricate designs. Use a
graphics tablet or a mouse to trace the text by hand, ensuring you capture all
the details accurately.
Ensuring Accuracy and
Consistency
Manual tracing requires a steady hand and attention to detail. Take
your time to ensure accuracy and consistency across your vector text.
Tools and Techniques for Manual
Tracing
Use tools like the Pen Tool and Shape Builder Tool for manual tracing. These tools allow you to create precise paths and shapes, ensuring your vector text is accurate.
Automated
Text Vectorization
How Automated Tools Work
Automated tools use algorithms to convert raster text to vector.
Simply upload your text image, and the tool will generate a vector version.
Benefits and Drawbacks of
Automation
Automated tools save time and effort but may lack the precision of
manual methods. They are ideal for simple designs but may struggle with complex
text.
Best Practices for Using
Automated Tools
Automated tools use high-quality images for the best results. Review and refine the generated vector to ensure it meets your standards.
Fine-Tuning
Your Vector Text
Adjusting Anchor Points and
Paths
Fine-tune your vector text by adjusting anchor points and paths. This
ensures your text is smooth and accurately represents the original design.
Refining Curves and Edges
Refine curves and edges to achieve a polished look. Use tools like the
Smooth Tool to eliminate any rough or jagged edges.
Ensuring Smooth and Clean Lines
Ensure all lines and curves are smooth and clean. This creates a professional and visually appealing vector text.
Working
with Special Characters and Glyphs
Vectorizing Special Characters
Special characters may require additional attention. Ensure they are
accurately vectorized and maintain their original form.
Handling Glyphs and Custom Fonts
Custom fonts and glyphs can add uniqueness to your design. Handle them
carefully to preserve their distinct characteristics.
Maintaining Consistency in
Design
Consistency is key in design. Ensure all elements, including special characters and glyphs, align with the overall design style.
Combining
Text with Other Vector Elements
Integrating Text into Logos and
Icons
Integrate vector text seamlessly into logos and icons. Ensure the text
complements the overall design and enhances its visual appeal.
Creating Complex Designs with
Text and Graphics
Combine vector text with other graphic elements to create complex
designs. Experiment with different layouts and compositions to find the best
arrangement.
Layering and Grouping Techniques
Use layering and grouping techniques to organize your design. This helps manage complex designs and ensures all elements are properly aligned.
Saving
and Exporting Your Vector Text
Best Practices for Saving Vector
Files
Save your vector files in formats like SVG, EPS, or PDF. These formats
preserve the quality and scalability of your design.
Exporting in Various Formats
(SVG, EPS, PDF)
Export your design in different formats to ensure compatibility with
various platforms and media. Each format has its advantages, so choose based on
your specific needs.
Ensuring Compatibility Across
Platforms
Check that your exported files are compatible with different platforms and devices. This ensures your design looks great everywhere.
Optimizing
Vector Text for Different Media
Preparing Vector Text for Print
Optimize your vector text for print by ensuring high resolution and
proper color settings. Use CMYK color mode for best print results.
Optimizing for Web and Digital
Use
For web and digital use, optimize your vector text by using RGB color
mode and appropriate file formats like SVG. This ensures your text looks sharp
and loads quickly online.
Ensuring Scalability and Quality
Ensure your vector text is scalable and maintains high quality across different media. This guarantees a professional and polished appearance.
Common
Pitfalls and How to Avoid Them
Mistakes to Watch Out For
Common mistakes include incorrect font matching, poor alignment, and
inconsistent spacing. Avoid these by carefully reviewing your design at each
step.
Tips for a Smooth Vectorization
Process
Plan your vectorization process carefully. Use the right tools and
techniques to ensure a smooth and successful conversion.
Troubleshooting Common Issues
If you encounter issues, troubleshoot by checking font settings, alignment, and compatibility. Make adjustments as needed to resolve any problems.
Advanced
Techniques in Text Vectorization
Creating Custom Text Effects
Experiment with custom text effects to add uniqueness to your vector
text. Techniques like gradients, shadows, and textures can enhance your design.
Using Blends and Gradients with
Text
Use blends and gradients to create visually appealing vector text.
These techniques add depth and dimension to your design.
Advanced Path Manipulation
Techniques
Explore advanced path manipulation techniques to refine your vector
text. Tools like the Pen Tool and Shape Builder Tool offer precise control.
Collaborating
with Designers and Clients
Communicating Your Vectorization
Process
Effectively communicate your vectorization process to designers and clients. Clear communication ensures everyone
is on the same page.
Getting Feedback and Making
Revisions
Solicit feedback from clients and make revisions as needed. This
collaborative approach leads to better designs and satisfied clients.
Ensuring Client Satisfaction
Ensure client satisfaction by delivering high-quality vector text that
meets their requirements. Pay attention to detail and adhere to their
specifications.
Encourage experimentation and creativity in vectorizing text. The more
you practice, the better you'll become at creating
professional-quality vector designs. Eagle Digitizing offers vector conversion services to support your journey.
Invest in continuous learning and improvement. Explore new techniques and tools
to stay updated with the latest trends and enhance your skills.


